Installation
It is important to follow all relevant steps on this page!
Access your asset via the Package Manager -> My Assets, find NimGui, download and import
it into your project.
Dependencies
ImGui aims to be easy to setup, but requires the minimum dependencies such as
- Burst Compiler: 1.7.0
- Unity Collections: 1.3.1
- Unity Mathematics: 1.2.6
All packages above can be installed via the Package Manager. For experimental/preleased/preview packages such as Unity Collections, please ensure that your Package Manager can show them.
For more information, please visit the Unity docs here.
Installing Dependencies Manually.
Alternatively, you can install all these packages by editing Packages/manifest.json directly in
your project and adding the following to your dependencies:
"com.unity.collections": "1.2.3",
"com.unity.burst": "1.6.4",
"com.unity.mathematics": "1.2.6"
Burst Compiler
Burst Compiler is used to optimize & vectorize the mesh generation each frame.
Unity Collections
Likewise, because we are using Unity's Burst Compiler, we also utilize Unity's Collection package which are designed to be thread friendly and compatible with Unity's Burst Compiler. Please make sure this is installed via the Package Manager.
Optional Dependencies
Some dependencies are optional because you may or may not be using the packages in your project.
- Universal Render Pipeline (URP)
- Builtin Render Pipeline
- Input System
Universal Render Pipeline (URP)
In general any SRP that supports render features should work, however this framework was initially built with URP.
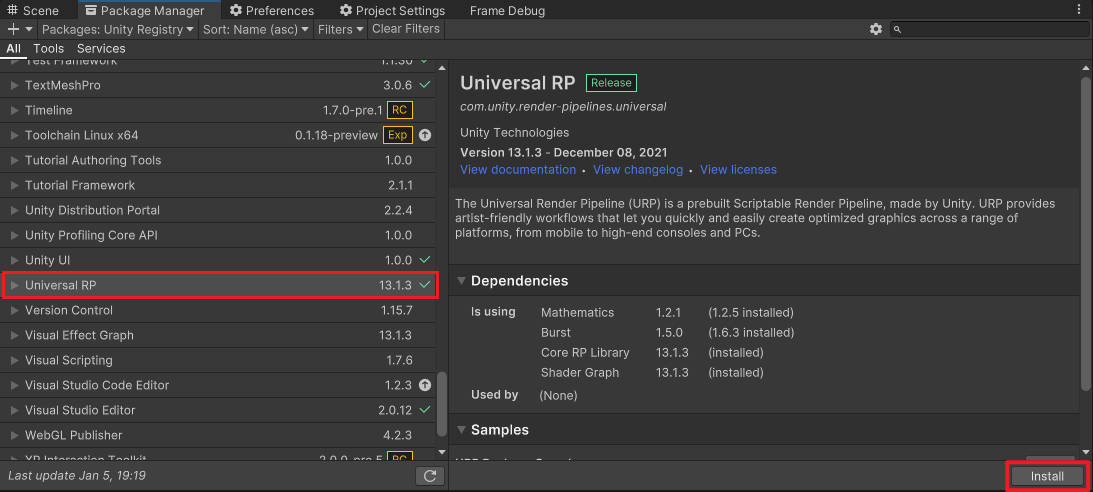
Grab URP from the Package Manager by navigating to:
Window -> Package Manager -> Unity Registry
Find Universal RP and click the install button.
Setting Up the Render Feature
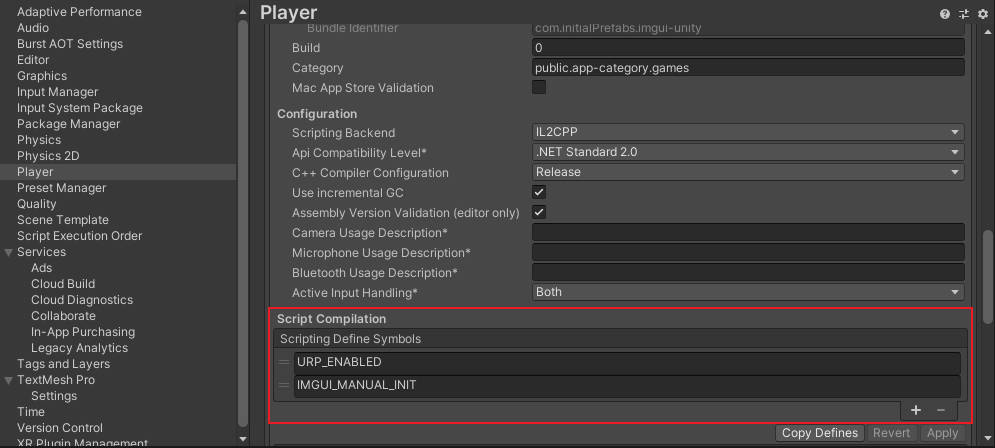
- Access your Scripting Defines, by going to
Edit -> Project Settings -> Player - Go to
Player -> Other Settings -> Scripting Define Symbols. - Add
URP_ENABLEDas a scripting symbol.
Updating an existing URP Asset
If you already have an existing URP Asset assigned to your Graphics Settings.
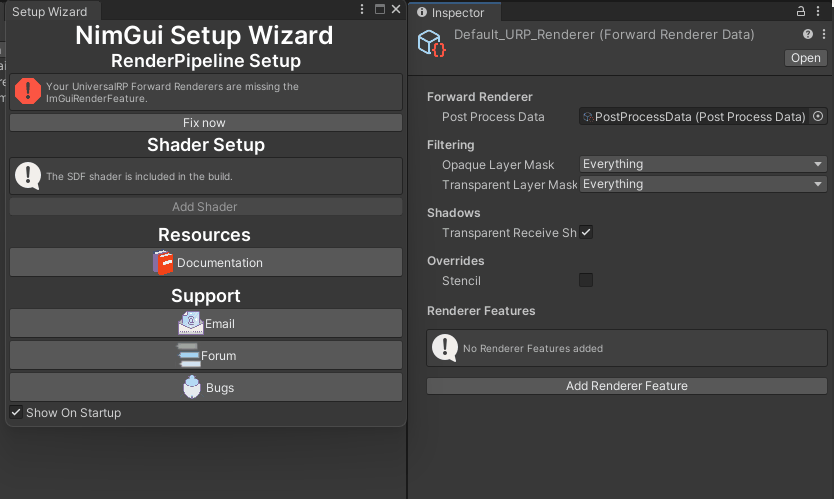
- Go to
Tools -> NimGui -> Setup Wizard. - Under
RenderPipeline Setup, click the Fix now button. This will add theImGuiRenderFeatureto your existing URP Asset (don't worry you can undo this by pressingCtrl/Cmd + Z).
Starting Fresh with URP
- Create a Universal Render Pipeline asset, by right clicking in the project view.
- Select
Rendering -> Universal Render Pipeline -> Pipeline Asset (Forward Renderer) - Select the Forward Renderer asset which was created alongside your Pipeline Asset and
click,
Add Render Feature. FindImGuiRenderFeaturefrom the dropdown and add it to your Render Features.If you are using URP + 2D, URP version 12.x.0 onwards, the 2D workflow natively supports Render Passes. For version 11.x.0 and below, you will need to force the render passes to load.
Builtin Render Pipeline
Because we will need a hard dependency on the Camera, you will need to setup the camera manually for the Builtin Render Pipeline compared to the SRP alternative. You will need to call the following functions for set up and clean up:
// Put this in OnEnable for a MonoBehaviour
DefaultImGuiInitialization.SetupCamera(camera, cameraEvent);

// Put this in OnDisable for a MonoBehaviour
DefaultImGuiInitialization.TearDownCamera(camera, cameraEvent);
Adding Shaders to Builds
It is important to set up NimGui's SDF shader to always be included in your builds. If you create a build without including the shaders NimGui will not render and may cause your game to crash.
- Go to
Tools -> NimGui -> Setup Wizardand a new window will open. - Click the
Add Shader- If the button is disabled, then that means the SDF shader is already added to the
Always Included Shadersof your graphics settings.
- If the button is disabled, then that means the SDF shader is already added to the
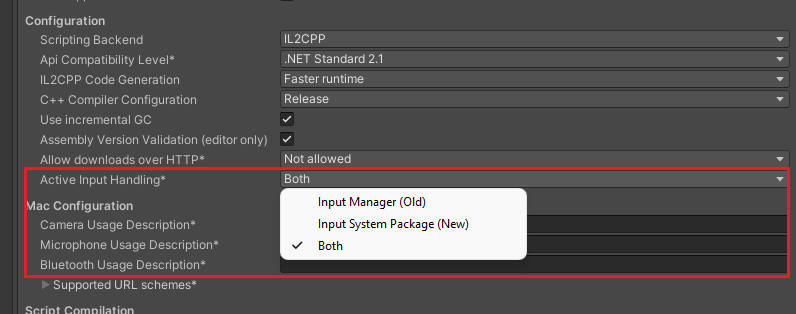
Choosing your Input Backend
You are free to use Unity's legacy Input Manager or their new Input System.
 ;
;
If you choose Input Manager (Old), then NimGui will use the UnityEngine.Input class. If you choose
Input System Package (New), then NimGui will use UnityEngine.InputSystem as its default
input backend.
If you choose Both, then NimGui will use the legacy input system by default.